Stampin' Up! Independent Demonstrator

Sunday, December 29, 2013

Little Shop of Horrors

No, my blog post title isn't describing my stamping room.  I am referring to the play Little Shop of Horrors.  It's coming to Seattle in March and we bought tickets to it for my daughter for a birthday gift.  I made the card below for her, too.  Now, if you've never seen the play or movie, the card will not make much sense.  But she knew immediately that it was Audrey 2, the carnivorous plant in the play.

I must give credit to Amy Downing for the basic design.  I saw her card and used it to make my own version.  Amy's website is at http://amyzingcards.blogspot.com/, but she never did post a picture of her card on her blog.  Thank you, Amy, for the inspiration!

And, just in case you're worried ;-) that I spoiled the birthday surprise for my daughter (since her birthday is in January), I already gave her the card and had her choose the date she could make it to the play.  I even had a leaf poking out of the back of the envelope to give a hint of what was inside.

I also wrote a poem for the inside the card based on the play's theme song, Suddenly Seymour.  It was hokey but cute.

FYI, Little Shop of Horrors is a fun movie, too.  It stars Rick Moranis and also has Steve Martin, John Candy, James Belushi, Christopher Guest, Bill Murray, and Ellen Greene.

Happy New Year.


Monday, December 23, 2013

Gift Bags Galore

At my last downline meeting, we made gift bags using the Envelope Punch Board.  Then, we made bows using the envelope punch board, too.  I tell you, I use that envelope punch board a lot!

Below is a picture of one of the bags we made in class.  I normally would put a tag on it to hang down the front, but this one is going in a Christmas stocking, so I left the tag off.


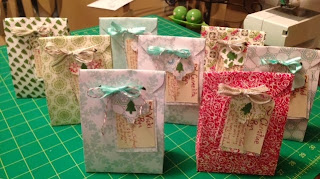
My friend Ryn was in the class, and she went home and made several (well, it looks like she made at least eight) of the bags.  She punched holes and tied ribbons for the bows, and look how cute her bags are!  Thanks, Ryn, for sending me the photo of your bags so I could share it.  The tag hanging down looks great, too.


Merry Christmas.


Monday, December 9, 2013

Pop-Up Tree Card

For anyone who really knows me, you know I hate fussy-cutting.  However, I will do it when there's a card I absolutely love.  I found the pop-up Christmas tree card directions at http://extremecards.blogspot.com/ and want to thank Carol at Extreme Cards and Papercrafting for sharing her projects and patterns.  The pattern and instructions are at http://extremecards.blogspot.com/2011/12/3d-christmas-tree-pop-up-card-tutorial.html .

The front of the card looks like a regular Christmas card.  I used Stampin' Up! products to make the card front.  The card pictured below was made for Judy (my neighbor and my downline).


Once opened, the card pops to life with a three-dimensional tree.  This inside pop-up is what I learned how to make using the pattern provided by extremecards.blogspot.com.  Cute, eh? 


Here's a picture of another card I made for Sandy, another member of my downline:


These cards were fun to make and even more fun for folks to receive.  Check out extreme cards website.  It's great.

Supplies Used:

Cardstock:  Island Indigo, Night of Navy, Whisper White, and Silver Foil Sheet
Stamp Sets:  Christmas Messages, More Merry Messages
Framelits:  Festive Flurry Framelits Dies
Other:  Glitter Paper

Tina


Sunday, December 1, 2013

Finally

I made an exploding box to hold a gift card for my son's girlfriend's birthday.  I finally was able to give it to her yesterday.  I also carved a stamp of their French bulldog puppy for her.

First, the stamp.  I made the box to hold the stamp and a black stampin' spot (ink pad) for her.  I love the new Undefined Stamp Carving Kit.  It takes a little practice, but I was able to make the stamp to look like their new puppy.


Here's a better picture of what I carved:


I also made Alicia an exploding box.  On one side, I put a card that had the months and days so I could mark her birthday.  I had each of the fours sides of the outside of the box decorated different from one another.


Of course, when you open the box, it "explodes" open.  I had a gift card standing up in the middle.


I've had fun making and giving these exploding boxes. 

Supplies used:
Cardstock:  12" x 12" Cherry Cobbler, Basic Black
Ribbon:  Cherry Cobbler 1" Stitched Edge Grosgrain Ribbon
Stamp Sets:  Six-Sided Sampler, Chalk Talk, Bring on the Cake, Yippee-Skippee!
Misc:  Rhinestone Basic Jewels


Monday, November 11, 2013

Exploding with Candy

I'm teaching a stamp class for a woman's group tonight, and I have two members of the group who will be my assistants since it's a large group.  To thank them, I've made them each an exploding box with peppermint candy inside.  Here's the outside.


The top of the box is so simple yet pretty that I took a photo of it, too.


When the lid is lifted off, the sides fall open.  The weight of the candies make the sides fall right down.  


Supplies Used:
Stamp set:  Best of Christmas
Stamp pad:  Cherry Cobbler
Paper:  Gold and Silver Foil Sheets, Cherry Cobbler cardstock, Season of Style Designer Series Paper, Whisper White cardstock
Embellishment:  Frosted Finishes Embellishments
Punches used:  Large Oval, Scallop Oval, Christmas Ornament Punch
I used  glue dots to hold the candy onto the sides.  I used the Stampin' Trimmer Small Scallop Rotary Cutting Blade on the corner pieces so it gives those corners a pretty edge.

I so loved how this box turned out that we made them at my downline meeting on Friday, too.  There's something about silver and gold together that just makes me happy.


Saturday, November 2, 2013

Exploding Birthday Card/Box

Hi,

I made this card for my friend (and coworker), but I wanted to wait until I gave it to her before I posted it.  I spritzed sparkle on the sides of the box--maybe you can see it in the picture below.


When she removed the lid, the box opened.  There is a pumpkin standing up in the center because her birthday is on Halloween.


The other side of the pumpkin is a flower.  I avoided the traditional Halloween look for her card this year.


I will be making this exploding box with my downline this coming week.  We'll also make the exploding box I posted on my blog on August 25 (or click here).

Thanks for looking.
Tina


Sunday, October 13, 2013

My Autumn Banner

I wasn't sure I'd like the Build a Banner Simply Created Kit in the Stampin' Up! Holiday Catalog, so I didn't order it.  When my friend, Pennie, invited me over to make a banner with her, I wasn't sure what to expect.  Well, what fun it turned out to be!  The kit has 18 blank canvas pennants, twine, and alphabet and image stencils.  I made an autumn banner to hang over the fireplace.  I decided not to use the letter stencils on this one, but now I wonder if I should have done "THANKFUL" like Pennie did on hers.  Nonetheless, I love it AND I had a lot of fun designing it.  Thanks, Pennie.  If you want to visit Pennie's blog, a link to it is in the right-hand column on my blog.


Until next time, happy autumn.

Saturday, October 12, 2013

Downline Stamp Class

I had a stamp class with my downline earlier in the week.  Below is a picture of my downline:  Sandy, Judy, and Ryn.  As you can see, we were making Grinch Christmas cards.


Judy (below) is working on a washi tape Christmas card, the second card we made that day.


Ryn and Sandy (below l to r) are using the Big Shot.


Judy made some high heel cupcakes to share with us.  These were practice for the ones she and Sandy made later in the week for a church gathering.  If you look closely at the yellow ones in the center front, you can see the "high heels."  I wish I had taken a side view so you could really see the platform high heels.  Very cute.  As you can see, Judy is quite talented at cake-making as well as card-making.


Does seeing those cupcakes make you want one?  I generally don't care for cake (or pie or cookies...), but these make me want a taste.  Truth be told, Judy did share them with the group, so I had one for dessert that very day.  And yes, they were delicious as well as pretty.


Wednesday, September 25, 2013

My Three-Mistakes Card

You know those new foil sheets in the Stampin' Up! Holiday Catalog?  Well, I wanted to use the gold to cut out some snowflakes using the Festive Flurry Framelits dies.  That's when my mistakes happened.


Mistake number one:  I was cutting out two snowflakes, but after I ran them through the Big Shot, I realized I had put one die upside down.  Yep, it didn't cut, but it left the gold foil paper with a nice impression of the snowflake.  Well, I had one snowflake and a ruined piece of gold foil paper -- or so I thought.

Mistake number two:  I cut the white background cardstock to emboss it using the Pretty Print Textured Impressions Embossing Folder.  After I embossed it, I realized I had cut it too small.  Drat.

Mistake number three:  I heat embossed (using gold embossing powder) the greeting (from the Joy to the World stamp set in the holiday catalog).  It was perfect -- until I noticed a mark to the right of the word "Holidays."  I tried to tell myself the recipient probably wouldn't notice it, but it was all I could see.

It all came together  for me, though, when I used that ruined piece of gold foil paper as the bottom layer.  The ruined part doesn't show now.  It also made the white embossed layer a perfect size. 

And, remember that one snowflake I had cut?  It worked great to cover that stray mark that was just after the word "Holidays."  All it needed was a bit of silver sparkle, and the Glimmer Paper was perfect for the job.

I think someone special will get this card this Christmas.


Monday, September 23, 2013

Now I can post this card

I made the card below for my friend, Pennie.  I had to wait until I gave it to her before I posted it (happy birthday, Pennie).  I embossed the back flap of the envelope as well as the card front with the new Pretty Print Textured Impressions Embossing Folder by Stampin' Up!


If you look at the close-up picture below, you may be able to see the sparkle on the flower. 


I made the card several weeks ago and could hardly wait to give it to her.  I took it to her yesterday, so now I can post it.  I don't know about you, but that happens to me all the time.  Whenever I make a card for someone, I want to give it to that person right then.  You can imagine the trouble I'm having with all the Christmas cards I'm making.  I know who some of them are for, and I want to send them off today.  I will wait, though, at least until the first of December.


Wednesday, September 18, 2013

Festive Flurry

I wanted to make a Christmas card for a coworker that I knew (hoped?) she would love.  The result is below.  I sure hope she oohs and aahs over it when she gets it.  I guess  have to wait until December to find out.


The Details
I used the Stampin' Up! Festive Flurry Framelits Dies and Festive Flurry stamp set.  The Designer Series Paper is the Winter Frost paper in the holiday catalog.  You can't quite tell from the photo, but I used the silver foil sheet for the background square (behind the white) as well as for two snowflake cuts.  You can see the solid silver points in the snowflake layers.  The card stock for the card itself is Smoky Slate.  A Frosted Finishes Embellishment is in the center.  Perfect!

I had planned to put a sentiment on the front, but decided I liked the card as it is.  Now, I must wait since it's three months until Christmas.  I don't know about you, but when I make a card specifically for someone, I want to give it to that person right away.

Sunday, September 15, 2013

It's not too soon to plan for Christmas

I was so inspired by a card done by Brian King that I did a few variations of it.  You can see his original card at his blog at stampwithbrian.com.  His blog is worth checking out and adding to your list to follow.  Even if you don't stamp, his writing is entertaining and interesting (synonyms?).

The card below is basically the same card Brian made only I turned the star background on point.


The next version of the card is basically the same but is done in blues.  I sponged the silver glimmer paper with soft sky ink.


I stepped it up a bit for this last card.  I trimmed the layers in Cherry Cobbler cardstock.  It sure sets it all off nicely. 


Supplies Used:

Glimmer Paper:  Silver, Champagne
Cardstock:  Whisper White, Cherry Cobbler, Brushed Gold (in top card), Baked Brown Sugar (in bottom card), Soft Sky, and Island Indigo (in middle card)
Stamp Set:  More Merry Messages
Big Shot and Festive Flurry Framelits Dies

Sunday, August 25, 2013

Gift Card Box

My exercise teacher celebrates Hanukkah, so I wanted to make her something to hold a gift card.  Hanukkah is at the end of November this year, but it's nice to have things done early -- at least in my little world.  The box I came up with uses the textured 12" x 12" cardstock in Island Indigo and Smoky Slate from the holiday catalog.


 I found many online tutorials on how to make the box, and I combined elements from several of them as well as adding my own touch.  Below is a picture of the top of the box.

See that curly clear ribbon?  Well, it's not ribbon.  It's that plastic strip that Stampin' Up! has around the ribbon to hold it in place.  I cut off the ends and curled it and used it to jazz up the top of the package.


When you open the box, the four sides fall open as pictured below.  The center holds a gift card.  I downloaded clip art for the pictures and typed some Happy Hanukkah sayings and printed these four things on our whisper white card stock. 


I used the new envelope punch board to make the gift card holder that stands up in the center of the gift.  The Festive Flurry stamp set and dies were used for the snowflake on the front of the card as well as on the front of the gift card holder.

Card stock:  textured 12" x 12" cardstock in Island Indigo and Smoky Slate, Whisper White, Bermuda Bay, Smoky Slate
DSP:  Winter Frost Specialty Designer Series Paper
Stamps:  Festive Flurry 
FrameLits:  Labels Collection, Festive Flurry
Embossing Folders:  Stylish Stripes Textured Impressions Embossing Folder
Punches:  Blossom (used to make the flower on top of the package)
Ribbon:  Okay, I admit I used a retired product here.  The ribbon that was perfect was from Sale-a-bration.  The color was just right--Island Indigo--and it was just what I needed.
Other:  Rhinestone Basic Jewels (in center of snowflake on the inside of package), brad (I used a retired brad for the center of the flower.)
Snowflake Info:  I used Iridescent Ice embossing powder on vellum to emboss the snowflake inside the box.  I used white craft ink to stamp the snowflake on the outside of the box.  I then took each of those snowflakes and mounted them on cardstock that I had also cut out.

My supply list ran long on this one.  If you've read this far, wow, I'm surprised (and thrilled)! 

I have a feeling my exercise teacher will love this gift card holder.  I'll bet she'll reuse it for a gift card for her daughter.  She did that last year, and the card holder I made wasn't as fun as this one. 


Monday, August 12, 2013

I'm already thinking about Christmas

I can't help it.  Try as I might to set my mind on making autumn cards, I find myself making another Christmas card.  I've been coming up with different designs so I can choose what I want to offer at my October stamp camp.  I will offer at least three -- maybe four -- different cards.

I wasn't happy with my snowflake card until I put the Frosted Finished Embellishments in the center of the snowflake.  Perfect!  The silver embossing powder was used both on the snowflake and the sentiment.

Stamp Sets:  Festive Flurry stamp set, More Merry Messages
Big Shot:  Festive Flurry Framelits Dies 
Cardstock:  Night of Navy, Smoky Slate
Other:  Silver Emboss Powder


I had some fun playing with the Circle Card Thinlits Die.  I used Iridescent Ice Embossing Powder on Coastal Cabana cardstock for the snowflake.  Once again, it was the Frosted Finished Embellishments placed in the center of the snowflake to save the day.

Here's the card opened.  I left the right side of the circle (with the saying) blank so I could sign the card there.  By the way, the Merry Christmas is heat embossed with clear embossing powder.


Stamp Sets:  Christmas Messages, More Merry Messages
Big Shot:  Festive Flurry Framelits Dies,  Circle Card Thinlits Die
Cardstock:  Whisper White, Smoky Slate, Coastal Cabana
DSP:  Winter Frost Specialty Designer Series Paper
Other:  Silver Emboss Powder

The card below is a tried and true design, but I think it will be fun to do in class.  Besides, that stamp set sentiment is perfect for this card.


Stamp Sets:  More Merry Messages
Cardstock:  Whisper White, Real Red, Basic Black, Daffodil Delight, Pumpkin Pie, Rich Razzleberry, Gumball Green, Pacific Point, Melon Mambo
Other:  Dazzling Details (on the light bulbs)

Thanks for coming by to see the cards.
Tina

Sunday, August 4, 2013

Circle Card Thinlit Die

I was very excited to win the new Circle Card Thinlit Die at the convention.  It cuts and scores the card all in one step.  Amazing -- and fun to use.


The Christmas card above has some silver glimmer paper to add a little pizzazz .
Cardstock:  Coastal Cabana, Whisper White, and Basic Gray cardstock
DSP:  Winter Frost Designer Series Paper Stack
Stamps:  Christmas Collectibles, Christmas Messages
Punches:  Scallop Edge Border, Christmas Ornament Punch, 1 3/4" Scallop Circle
Framelits:  Circles Collection, Circle Card Thinlits Die


Another swing card made from the Circle Card Thinlits Die.


Cardstock:  Tangerine Tango, Crumb Cake, Naturals Ivory
Stamps:  Perfect Blend, Gorgeous Grunge
Punches:  Chevron Border Punch, 1 3/4" Scallop Circle
Framelits:  Circle Card Thinlits Die

Monday, July 29, 2013

Just a few pictures that aren't of cards...

I had a wonderful time at the Stampin' Up! convention and decided to share a few more photos.
Pennie when she won a prize.  Pennie introduced me to stamping just over a year and a half ago.  She not only recruited me to join Stampin' Up!, but she is now a good friend.

 I was thrilled to meet Justin Krieger and Brian King at the Stampin' Up! offices.  They both design wonderful cards and have great blogs.

I met Mary at convention.  She is also part of Pennie's downline.  I hope to see her again at future conventions (since we live on opposite coasts).

The picture above is of one of the screens showing what was happening on stage.  Pennie is on the far left.  She was on stage for having earned a trip.  

I got to finally meet Sherill Graff one evening.

Carol and I are both in Pennie's downline.  She and I are both Italian, and I told Carol that she could walk into one of my family reunions and fit right in with everyone there.

Of course, I met many other people, too, but either forgot to take pictures or the pictures didn't turn out (blurry).   While I was at convention for three days, my husband, Tom, did some genealogy research and some hiking.  He had a good time in Salt Lake City, too.


Sunday, July 28, 2013

A New Look to My Blog

I wanted a whole new look to my blog -- something clean and simple.  You know how it goes, though.  Change one thing and it snowballs.  I ended up creating a new header in My Digital Studio.  The more I use it, the more I love MDS.  Then, I redesigned a few other things.  Several hours later, I was done.

Okay, so I can't post without putting at least one picture of a card.  Several months ago I made the card below for my friend, Judy, when her grandchild was born.  It's called a double-fold gate card (as well as double-gate card).


Unfortunately, the Designer Series Paper I used is no longer available since I made the card last spring, but it's still a fun card.

Friday, July 26, 2013

Convention and Cards

The photo below is a picture of the convention crowd of demonstrators when the doors opened.  Yes, it made me think of sardines.  We certainly were packed in there -- and I was somewhere in the midst of that crowd.  There were almost 6,000 demonstrators at the convention.


Before the convention began, I did a tour of the Stampin' Up! home office.  I took the photo below there. 


The kite card below is one we made in my stamp camp last month. I used the directions a Stampin' Up! demonstrator, Kelly Gettelfinger, provided.  Her website is filled with many great ideas and videos:  http://alwaysstampin.blogspot.com/


I love the sympathy card below.  I totally copied it from Brian King, a Stampin' Up! demo.  I met Brian at the convention and told him how I had a downline meeting and we made the card exactly like his example.  He told me that he got a lot of great feedback about this card -- simple and gorgeous.  His website is at http://stampwithbrian.com/  if you want to see more of his work.


That's all I have for you today.  I'm looking forward to getting together with my my wonderful upline (I so appreciate all you've taught me, Pennie) today to look at all the swaps we both got from convention. 

Tina