Stampin' Up! Independent Demonstrator

Monday, August 18, 2014

Christmas Bliss

I'm working on Christmas cards and made a Christmas Bliss card.  I used the photo-polymer Christmas Bliss stamp set by Stampin' Up!  I love the combo of the soft sky, real red, and white cardstock.  The Confetti Stars Punch made all those punched stars a snap.  I also used the Lucky Stars Textured Impressions Embossing Folder.


Thanks for looking.

Tina

Thursday, August 14, 2014

Planning for Christmas

My next stamp camp (this coming Monday) will feature Christmas cards.  One card we'll make is below.  I used the Good Greetings stamp set that will be offered as a hostess stamp set soon.  This is a quick, simple card to make and is perfect for a class project.  It's not fancy, but it's fun to make -- especially taking the bite out of the Hershey Kiss. 


Sunday, July 13, 2014

Hero on a Waterfall

I made a waterfall card for my son's birthday using the Calling All Heroes stamp set.  Here's a picture of the card front:


How this card works is you pull down on the orange tab.  When you do, the top square lifts to reveal what is on the square below it:


I had a Bruce Wayne type guy on the first square.  The second square has a lightening bolt.  Pull it down a bit more, and Batman appears.


I also had stamped Make a Wish on the tab that pulls down.  Pull it down even further, and Batman flips up to reveal CELEBRATE. 


The "Make a Wish" stamp is from the Perfect Pennants stamp set and "celebrate!" came from And Many More, a new stamp set in the 2014-2015 catalog.

Other supplies used:

  • Cardstock:  Bermuda Bay, Whisper White
  • Designer Series Paper:  Confetti Celebration
  • Brads

Monday, July 7, 2014

A Striped Scallop Day

Today was one of my monthly stamp camp classes.  I had made a "diaper fold pouch" and filled it with teabags for each person.  One of these was at each person's place at the table. I used the Tea Party Stamp Set by Stampin' Up! to decorate the front of it.


In class today, we made a card below using the Striped Scallop Thinlit (for the Big Shot).


Besides the Striped Scallop Thinlit, I also used:


Ryn is one of the regulars in the class.  She decided to experiment and add a splash of color to the Striped Scallop.  She also curved her flower petals out; I had curved my flower petals down.  I love how her card turned out:


One more card I made using the Striped Scallop thinlit is below.  I used Bermuda Bay colored cardstock for the base of the card and cut the striped scallop using Coastal Cabana cardstock.  The feather stamp is from the A Happy Horray Stamp Set.


I've become intrigued with all the possible uses of the Striped Scallop thinlit.  It's my new favorite item in the new catalog -- at least until I turn the page and something else catches my eye.


Monday, May 19, 2014

Two Cards

My college roommate's mother celebrated her 90th birthday, so I made the card below for her.  The card is in white, black, and gold.  The flowers were made using the Petite Petals punch and the pansy punch from the Itty Bitty Accents Punch Pack (available June 2, 2014).  A black Candy Dot in the center of the flowers finished them off nicely.


The card below is a teabag holder card I made for a friend.  I met Diana when our husbands were in navigator training school in the Air Force back in 1981.  Once the card is untied, there is an envelope (made with the envelope punch board) that holds a tea bag.  She'll love the card.  Her birthday is in July, so I haven't mailed this one yet.  By the way, the blue designs above and below the bow are just two sections of the soon-to-be retired (retires June 1) Delicate Details Lace Tape.  I colored the lacy circles with the new Stampin' Blendabilities markers.  These new markers are alcohol ink markers made for blending and shading, but they also color those hard-to-color items like rhinestones and the lace tape.  I used the Tea Party stamp set.


I have a few more cards to make this week, and then I must start planning my upcoming classes.  I love every minute of planning the cards and teaching the classes.

Tina

Sunday, March 9, 2014

Easy-to-Make Napkin Rings

I was having some friends over for dinner, so I wanted something new for the napkins.  I saw some napkin rings that Lisa Harlow, a Stampin' Up! demonstrator, made and decided to make my own version of them.  They turned out quite cute, if I do say so myself.


I had a fork and knife in each napkin and wrapped it in Designer Series Paper.  The clothespin held it all together. 

Supplies used:
Designer Series Paper:  Gingham Garden
Accessories:  The mini clothespins were part of the Tag a Bag Accessory Kit, but they are also are available in silver and gold in the spring catalog - Mini Metallic Clothespins
Stampset:  Oh, Goodie from the holiday catalog


Thursday, February 27, 2014

Card holder and Cards

I was a bit surprised to realize that the last time I posted to my blog was January 18.  I guess it was time to take pictures of my cards and projects.  I tend to forget that part of the process -- taking the pictures before giving the card away.

Last month at stamp camp, we made the card holder pictured below.  The roses were fun to make using the Spiral Flower Originals Die.  If you have a Big Shot and don't have the spiral flower die, you may want to think about getting it!  Anyway, the holder has a 1/4" spine, so it holds four cards and envelopes quite nicely.


At the upcoming March stamp camp, we will make the two cards pictured below.  Both cards coordinate with the card holder. For the first card, I used three punches to make the flowers:  Pansy, Petite Petals, and Boho Blossoms.


I used the Happy Watercolor stamp set for the card below.  It's one of my favorite stamp sets from the Spring catalog.


There are a couple other projects for the upcoming stamp camp, but I'll save those photos for another post.

Tina


Saturday, January 18, 2014

My Stamping Space and Framelit Storage Solution

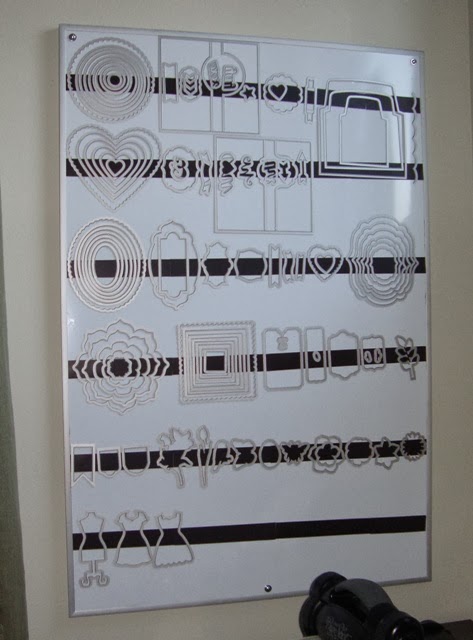
We had an old white board laying around, so I decided to try an idea I've seen a couple other Stampin' Up! demonstrators do to organize their framelits (thank you for the idea Wendy Waldman and Yapha Mason).  In the past, all my framelits were stored in the plastic envelope they came in, so I'd have to search envelope by envelope to find the one I wanted.  Now, I  only need to glance up on the wall above my Big Shot.  I put one-inch magnetic strips across the white board and my framelits stick quite nicely to the magnet.


Below is a close-up of the board:


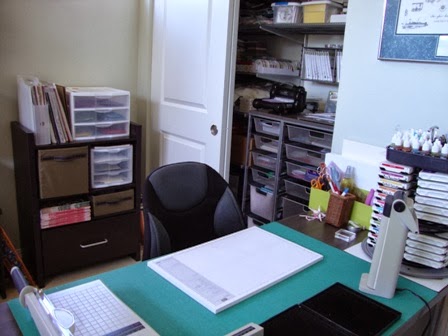
When we moved into our current home 2 1/2 years ago, this spare bedroom was our reading room.  In fact, my husband Tom had a comfortable recliner in the corner where he would read and listen to music.  But, as I got into stamping and needed more space, the room morphed into what it is today.  First, Tom installed Elfa shelves and drawer units in the closet for me.  It seemed like a lot of room -- for a while.  Below is a photo of the closet.


We got a sturdy work table also from the Elfa system at the Container Store.  The table is perfect when I stamp and plan, but it is too low (causing a backache) for all the cutting I was doing for my classes.  


And, that's why I moved into the other corner of the room with a higher work area (for my paper cutter and Big Shot), lots of storage, and great lighting.

Tom's reading chair was moved into a corner of our bedroom, and he is very happy reading there.  I think I have enough stamping space now, but my friend and upline, Pennie, laughed.  I think she knows something I don't know...


Friday, January 10, 2014

Card in a Box

I made a card-in-a-box for my brother. A huge thank you to Tanya Bell for the wonderful video tutorial she posted at http://stampingt.com.au/blog/?p=14141

Since I made this card for my brother who had knee-replacement surgery, I wanted a masculine look to it. I had to use a couple retired stamp sets to get the coffee pot and s{ick} stamps.


I used the Modern Medley Designer Series Paper because he likes eagles and this series of paper had birds on one of the sheets.  Also, I felt it had a masculine look to it.


Above is a photo of how the card folds up and fits in an envelope. 

The back panel is perfect to write a message.  I sent the card in a get-well package I sent to him. 

Stampin' Up! Supplies Used:
Designer Series Paper:  Modern Medley

Sunday, January 5, 2014

Wedding Place Cards

For a wedding gift for a friend, I made the wedding reception place cards.  I made the tents from the Brushed Silver Cardstock.  You really have to see this cardstock to appreciate how pretty it is.  The names were printed on Whisper White Cardstock.  The bride and groom printed the tags on the cardstock, so I only had to cut them apart and add the table numbers.

The Pikorua design on each tag (also featured on their wedding invitation and the wedding program) is a Maori symbol that "encompasses the solidifying of two people's love for one another."


Below is a close-up of the "tent."


The wedding, of course, was lovely!  Since the groom is Scottish, he wore a kilt (as did the best man, his brother).  A bag piper walked down the aisle just before the bride and then stopped off to the side to play the music for the bride to come down the aisle.

My contribution to the wedding was done.  Everyone knew where to sit -- a minor yet important role, eh?